Taking Screenshots belongs to the computer-related daily life of everyday. Whether you’re saving information, sharing instructions, reporting an issue or saving a visual record, screen snipping helps make the job quick and efficient. While Windows users are Germane to the Snipping Tool application, inquiry of Screen Snaps usually stumps Mac users on how it works in Apple macOS.
The good news is that macOS has powerful built-in tools for taking screenshots, which are very easy to use when you know the shortcuts. In fact, screen snapping on your Mac is as fast and versatile as people imagined. This guide states how to take screenshots on a Mac and snapping tool to get the most out of it.
What Is A Screen Snipping On A Mac?
Screen Snip on a Mac is another term for being able to take an image of all or parts of your screen and saving the image. Mouse and Keyboard Macro does not include a feature which is called a “Snipping Tool” as Windows does, but does have the same functionality (and more!) with keyboard shortcuts and with a built-in menu option of taking a screenshot on a Mac.
With Mac’s screenshots you can:
- Capture the full screen
- Capture a selected portion
- Capture a specific window
- Record your screen
- Select screenshot save location
All this works without the need to install any third-party software.
How To Cut The Whole Screen On Mac
If you would like to record everything that is on your screen, this is the quickest way of doing so.
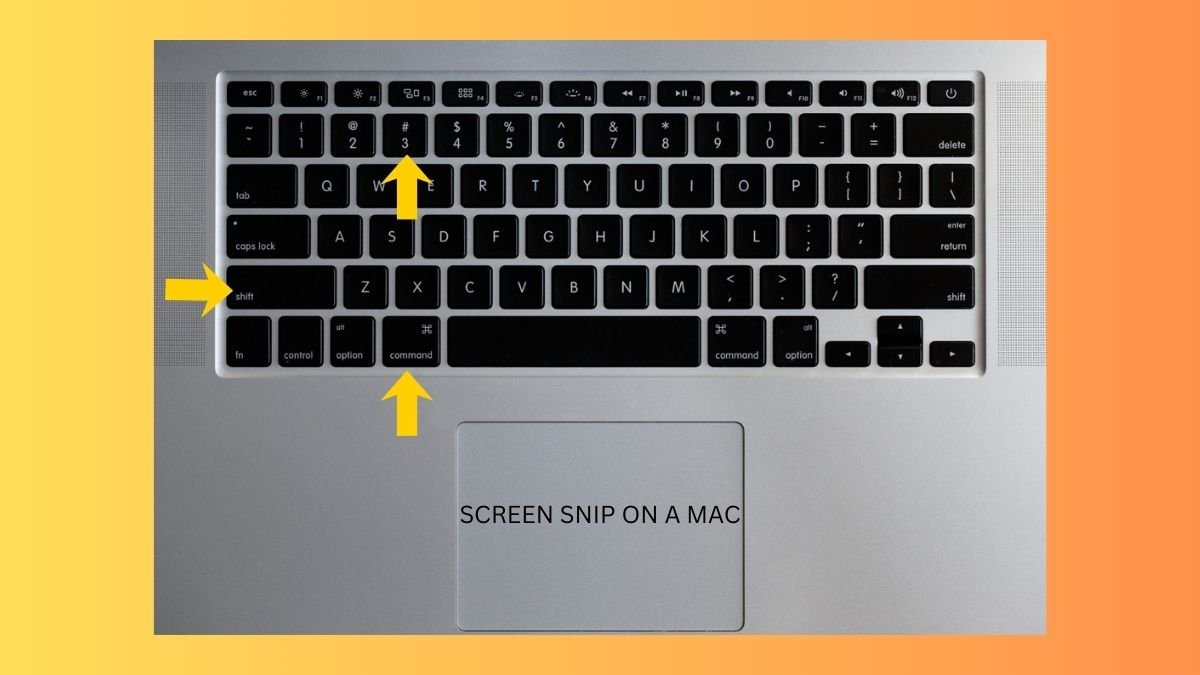
Press Command (⌘) + Shift + 3
The screenshot is taken in “the click of the button,” and the screenshot of the entire screen is considered. The default place for the image is on your desktop, and for a very brief moment, you will have the thumbnail picture in the corner of the screen.
This method is useful for:
- Saving full webpages
- Capturing system settings
- Recording error messages
- Sharing entire layouts or Dashboards
How To Cut Selected Area (Most Common Method)
This is the most used screen Snap option made in a Mac.
Press Command (⌘) + Shift + 4
The shape of your cursor changed to a crosshair. Use the click and drag method to select the area to be captured. Release the mouse or trackpad button and immediately the screenshot is taken.
This method is perfect for:
- Snapping of a paragraph or an image
- Sharing some of the screen in particular
- Avoiding too much Background Information
- You are completely in control with what gets captured.
How to Snip a Specific Window
If you want to grab not the whole screen, but just one app window, and you do not want to do a manual choice, it is easy for macOS.
Command ((⌘) + Shift + 4 + press Space bar).
The cursor of your mouse changes to a camera icon. Move the cursor to any open window and click. The Mac only gets that window, together with its shadow and hence it looks clean & professional.
This works well for:
- App demonstrations
- Browser windows
- Software tutorials
- Clean visuals and NO cropping
Using Screenshot Toolbar (Mac’s Built in Snipping Tool)
On a macOS, the operating system additionally offers a picture of the taking a look on screen view in the form of a full-on snapping tool.
Press Command (⌘) + Shift + 5
There is a toolbar along the bottom of your screen that appears with options to:
- Capture entire screen
- Capture selected window
- Capture selected portion
- Record entire screen
- Record selected portion
You can also select where the screenshots will be saved as well as set up timers and display the cursor when taking screenshots.
This is the best choice if you know you want to use the visual interface as opposed to the keyboard shortcuts.
Where Is Screen Snips Reply On Macos Located?
By default any screenshots are saved onto the Desktop. However, you can change this.
Using the toolbar for screenshot (Command + Shift + 5) click Options and specify another location for saving (for example).
- Documents
- Downloads
- Clipboard
- Custom folder
Saving to the clipboard is particularly useful if you need to immediately paste the screenshot in an email, document or chat.
How to edit a screenshot instantly
When you do a screenshot, you will be shown a small preview for a period of time a moment in the corner of your screen. The built-in editor is opened when it is clicked on.
From there, you can:
- Crop the image
- Draw or highlight areas
- Add shapes or text
- Sign documents
- Rotate or annotate
This feature of fast editing will both save time, and it will also allow not to get more apps.
Taking Screenshots from Touch Bar MacBooks
If you have a Touch Bar on your MacBook, then you can add the controls to get screenshots in your MacBook.
After you have enabled them, you can touch icons to:
- Capture the screen
- Capture a selection
- Record the screen
This is a touch-based alternative to visual control of users.
Common Screen Snipping Issues (and Solutions)
Sometimes ,screen snapping as it is is not working. Common fixes include:
- Illuminate that Keyboard Shortcuts are on in System Settings
- Restart your Mac if you are not getting any response to the screenshots
- Check up on space in storage – if screenshots not saving
- Upgrade the macOS to the newest version 15
Most of the time problems with the screenshots are transitory and are easy to fix.
Conclusion
Screen snapping on a Mac is easy, powerful and is already built into the utility of the macOS. Whether you want to capture the whole screen, a given window or even a small part of the screen, Mac provides you with quick and flexible tools to enable you to do the job.
With easy shortcuts, a full screenshot toolbar and built-in editing options, users of Mac don’t even need a separate snipping tool! Once you are comfortable with these features, taking and sharing screenshots is a breeze – and a useful addition to your everyday productivity.
Also Read: Redo Shortcut – Home Assistant Finally Allows Undoing And Redoing Changes